With Outstanding Claim Manager, you can identify unpaid claims and close them by posting zero payments and write-offs. An outstanding claim is a claim that does not have any associated insurance payments.
Note: Accessing Outstanding Claim Manager requires the "Outstanding Claim Manager" security right.
To process outstanding claims
In Office Manager, do one of the following:
Click
the Outstanding Claim Manager
button  on the toolbar.
On the File menu, click Outstanding Claim Manager.
If applicable, do one of the following:
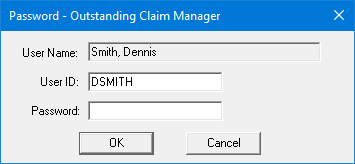
If the Password - Outstanding Claim Manager dialog box appears, user verification has been assigned to the "Outstanding Claim Manager" task. Do one of the following:
If your user account has been granted the "Outstanding Claim Manager" security right, enter your credentials in the User ID and Password boxes, and then click OK.
If your user account has not been granted the "Outstanding Claim Manager" security right, have a user with permission temporarily override this restriction so you can access Outstanding Claim Manager this one time. The overriding user enters his or her credentials in the User ID and Password boxes and then clicks OK.

If a message appears, informing you that you do not have rights to this operation, your user account has not been granted the "Outstanding Claim Manager" security right. To have a user with permission temporarily override this restriction so you can access Outstanding Claim Manager this one time, do the following:
On the message, click Yes.

In the Password - Outstanding Claim Manager dialog box, the overriding user enters his or her credentials in the User ID and Password boxes and then clicks OK.

Outstanding Claim Manager opens.

Set up the following options as needed:
Date Filter:
Select an option from the first list to search for claims according to the latest DOS date (date of service), claim creation date, or date sent date.
Select an option from the second list to include a claim according to whether that date falls between the dates specified, is greater than or equal to a specified date, or is less than or equal to a specified date.
Either specify a date by entering or selecting the same date for both the starting date and ending date, or specify a date range by entering or selecting the starting date of the range and the ending date of the range.
To enter a date, do any of the following:
To change the month, click the month portion of the date and then enter a month as a 1-digit or 2-digit number.
To change the day, click the day portion of the date and then enter a day as a 1-digit or 2-digit number.
To change the year, click the year portion of the date and then enter a year as a 2-digit or 4-digit number.
To select a date, do the following:
Click the corresponding calendar icon to view a month calendar.
![]()
Navigate to the correct month using the left and right arrows.
Note: To quickly change the year and month, click the month-year at the top of the calendar, navigate to the correct year using the left and right arrows, and then click the correct month.
Click the correct day.
Clinic Filter - To search for claims by clinic, do the following:
Select the checkbox.
Click
the search button  .
.
The Select Clinics dialog box appears.

Note: If your user account has been granted the "View All Patients" security right for the Central clinic, the ID and title of all clinics appear in the upper list; otherwise, the ID and title of each clinic for which your user account has been granted the "My Clinics, View" security right (in the "Practice/Clinic Setup" category) appear in the upper list; however, if your user account has not been granted that right to any clinic, only the ID and title of the clinic that you are currently logged in to appear in the upper list.
If the list is long, to search for a clinic by ID and/or title, do the following:
Click Search.
The options for searching appear in the upper list.

Enter the first character or more of a clinic's ID and/or title in the ClinicID and/or Practice Title box, respectively.
Click Show Results to view a list of matching clinics.
Note: To return to viewing the list of all the clinics, click Search, click Clear Search to clear the search criteria that you entered, and then click Show Results.
In the upper list, select one or more clinics.
Note: To select multiple clinics, click a clinic, and then, while pressing the Ctrl key, click the other desired clinics. To select a range of adjacent clinics, click the first clinic of the desired range of clinics, and then, while pressing the Shift key, click the last clinic of the desired range of clinics.
Click Add.
Repeat steps c-e as needed to add other clinics.
Note: To remove a clinic that you added, select that clinic in the lower list, and then click Remove.
Click OK.
Billing Type Filter - To search for claims by patients' billing types, do the following:
Select the checkbox.
Click
the search button  .
.
The Select Billing Type dialog box appears.

If the list is long, to search for a billing type by ID or description, do the following:
Click Search.
The options for searching appear in the upper list.

Enter the first character or more of a billing type's ID or description in the ID or Description box, respectively.
Click Show Results to view a list of matching billing types.
Note: To return to viewing the list of all the clinics, click Search, click Clear Search to clear the search criteria that you entered, and then click Show Results.
In the upper list, select one or more clinics.
Note: To select multiple billing types, click a billing type, and then, while pressing the Ctrl key, click the other desired billing types. To select a range of adjacent billing types, click the first billing type of the desired range of billing types, and then, while pressing the Shift key, click the last billing type of the desired range of billing types.
Click Add.
Repeat steps c-e as needed to add other billing types.
Note: To remove a billing type that you added, select that billing type in the lower list, and then click Remove.
Click OK.
Guarantor Range Filter - To search for claims by guarantor, do the following:
Select the checkbox.
To specify guarantors, do one of the following:
To include a specific guarantor, select the same guarantor for both From and To.
To include a specific range of guarantors, select the starting guarantor (alphabetically by last name) of the range for From and the ending guarantor of the range for To.
To select a guarantor for From or To, do the following:
Click the corresponding search button
 .
.
The Select Patient dialog box appears.

In the Enter Last Name box, enter the last name of a guarantor.
Note: For information about all the search options that are available in the Select Patient dialog box, refer to the topic about selecting a patient.
Do one of the following:
Double-click the correct guarantor in the list of results.
Select the correct guarantor in the list of results, and then click OK.
Insurance Carrier Range Filter - To search for claims by insurance carrier, do the following:
Select the checkbox.
To specify insurance carriers, do one of the following:
To include a specific insurance carrier, select the same carrier for both From and To.
To include a specific range of insurance carriers, select the starting carrier (alphabetically by name) of the range for From and the ending carrier of the range for To.
To select an insurance carrier for From or To, do the following:
Click the corresponding search button
 .
.
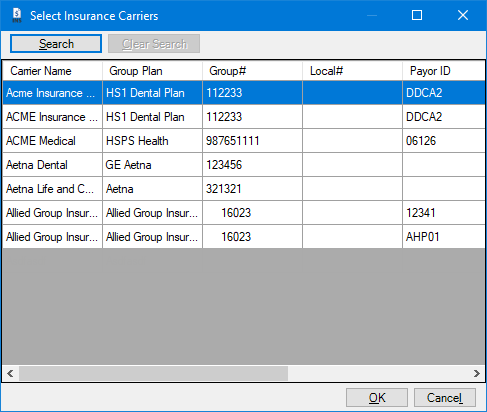
The Select Insurance Carriers dialog box appears.

Do one of the following:
To get a list of all insurance carriers, do not enter any search criteria.
To search for insurance carriers by name, group plan name, group plan number, local number, and/or payor ID, enter the first character or more of an insurance carrier name, group plan name, group plan number, local number, and/or payor ID in the Carrier Name, Group Plan, Group#, Local#, and Payor ID boxes, respectively.

Note: To clear any text that you have entered, click Clear Search.
Click Show Results to view a list of insurance carriers.

Note: To clear the list so you can search again, click Search.
In the list, select an insurance carrier.
Click OK.
Notes:
If you have made any changes to the filters, and you attempt to close the Outstanding Claim Manager, a message that asks if you want to save the new filters appears. To save the filters for the next time you open the Outstanding Claim Manager, click Yes.
If you have made any changes to the filters, and want to reset them to the default states, click Clear Defaults.
Click Review.
The Outstanding Claim Manager - Review and Process dialog box appears.

Specify the following information for the insurance payment:
Collecting Clinic - Select one of the following options to specify the collecting clinic:
Claim Clinic - The clinic that is associated with the procedures on a claim.
Specific Clinic - To select a specific clinic, do the following:
Click the search button  .
.
The Select Clinic dialog box appears.

Do one of the following:
To get a list of all clinics, do not enter any search criteria.
To search for a clinic by ID and/or title, enter the first character or more of a clinic's ID and/or title in the ClinicID and/or Practice Title box, respectively.

Note: To clear any text that you have entered, click Clear Search.
Click Show Results to view a list of clinics.

Notes:
If your user account has been granted the "View All Patients" security right for the Central clinic, the ID and title of all clinics appear in the list; otherwise, the ID and title of each clinic for which your user account has been granted the "My Clinics, View" security right (in the "Practice/Clinic Setup" category) appear in the list; however, if your user account has not been granted that right to any clinic, only the ID and title of the clinic that you are currently logged in to appear in the list.
To clear the list so you can search again, click Search.
In the list, select a clinic.
Click OK.
Check # - Optionally, enter the applicable check number.
Bank/Branch - Optionally, enter the account number of your clinic's or organization's bank.
In the upper list, select the desired claims, and then click Add to move them to the lower list.
Notes:
The Number of claims selected to process, Total estimate amount being written off, and Total fee amount being written off appear for your reference.
To remove a claim from the lower list, select it, and then click Remove.
Click Process.
When the claims have been processed, click OK on the success message that appears.
The claims in the lower list now have Processed (with a green background) in the Results column.

Click Close.